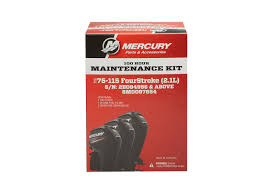
Mercury Mercury Mariner 100HR Service Maintenance Kit 75hp 80hp 90hp 100 115HP Outboard
Ensure peak performance of your Mercury outboard with the Mercury Mariner 100HR Service Maintenance Kit, designed for 75hp to 115hp engines. Includes essential components for reliable service and maintenance in marine environments.
Out of stock items can be ordered and shipped out within 3-5 working days
We despatch all orders within 24 hours. Orders placed weekdays before 4pm will be shipped the same day.
Call us and speak to an expert on 0191 4297309 - (Mon - Fri / 9am - 5pm).
Pickup currently unavailable at Marine Chandlery: North Shields

Mercury Mercury Mariner 100HR Service Maintenance Kit 75hp 80hp 90hp 100 115HP Outboard
Marine Chandlery: North Shields
Unit G4 Narvik Way
Tyne Tunnel Trading Estate
North Shields NE29 7XJ
United Kingdom

Ensure peak performance of your Mercury outboard with the Mercury Mariner 100HR Service Maintenance Kit, designed for 75hp to 115hp engines. Includes essential components for reliable service and maintenance in marine environments.
Ensure peak performance of your Mercury outboard with the Mercury Mariner 100HR Service Maintenance Kit, designed for 75hp to 115hp engines. Includes essential components for reliable service and maintenance in marine environments.
Description
The Mercury Mariner 100HR Service Maintenance Kit is an essential solution for maintaining the performance and longevity of your 75hp, 80hp, 90hp, 100hp, and 115hp outboard motors. This comprehensive maintenance kit is designed specifically for Mercury and Mariner outboards, ensuring that each component meets the demands of marine environments. Included in the kit are high-quality replacement parts, such as oil filters, fuel filters, and spark plugs, that have been meticulously selected to provide optimal performance and reliability. The marine-grade oil included in the kit is formulated to withstand the challenging conditions of marine operation, ensuring efficient lubrication and reducing wear on critical engine components. Typical use cases for the Mercury Mariner 100HR Service Maintenance Kit include routine engine upkeep, pre-season preparations, and post-season maintenance, making it perfect for recreational boaters, commercial operators, and marine service professionals. Regular maintenance not only helps in keeping the engine running smoothly but also enhances fuel efficiency, reduces emissions, and extends the life of the outboard motor. Practical benefits of using this service maintenance kit include ease of installation, as all parts are compatible with the specified engine models, and cost savings associated with preventive maintenance, helping avoid costly repairs in the future. By utilizing the Mercury Mariner 100HR Service Maintenance Kit, marine users can ensure their outboards operate at peak efficiency, providing reliability out on the water.
Specification
| Specification | Details |
|---|---|
| Product Name | Mercury Mariner 100HR Service Maintenance Kit |
| Compatible Engines | 75hp, 80hp, 90hp, 100hp, 115hp Outboards |
| Oil Type | 4-Stroke Engine Oil |
| Filter Type | Oil Filter |
| Fuel Filter | Included |
| Gear Lube | Included |
| Spark Plugs | Included |
| Maintenance Interval | 100 hours or annually |
| Kit Includes | Oil, filters, spark plugs, gear lube |
Delivery information
Standard delivery: 3-5 working days
Express delivery: 1-2 working days
Free delivery on orders over £100


